
Blog

  • ES6 Features | Block Scope & Arrow Function

    ES6 also known as ECMAScript 2015 took the JavaScript enthusiasts around the world by storm with its unique features. It’s more famous than any other ECMAScript version and you probably won’t find any JavaScript developer who hasn’t put the new ES6 features in practice. 

    Did you know?

    Six different versions of ECMAScript were released before ES6 (Yes, there was a version 5.1 too)!

    So, what makes ES6 different from the other ECMAScript versions?

    From the template literals to an arrow function, nearly every feature of ES6 is not just ingenious but solved some major issues with JavaScript. 

    In this article, we’ll be discussing two fundamental features of ES6 that will change the way you’ve been coding in JavaScript. Just to keep it interesting, our second ES6 feature, arrow functions can reduce five-lines of code into one! 

    Block Scope in ES6 | const and let 

    In programming, variables are used to store data. There are three ways to declare variables in JavaScript:

    • var 
    • let
    • const

    Before ES6, the variables declared in JavaScript had two scopes; local scope and global scope. The scope of a variable can be defined as the visibility and accessibility of the variable in certain parts of the code. A variable is said to have:

    • Function scope: when the variable is declared within the parenthesis of a function 
    • Global scope: when the variable is declared outside of the parenthesis or at the top of the overall program code

    To solve the issue of function and global scope in a variable, let and const were introduced in ES6. Both let and const are block-scoped variables and can only be accessed within the given block or parentheses that they are declared in. 

    Before ES6 – Variable Declaration using var

    Before ES6, a variable in JavaScript could be accessed outside the block or parentheses. One variable could even be re-assigned within the scope of a function. This lead to a number of issues:

    • Code became hard to maintain
    • Collision with variables from different libraries
    • Variable could be accidentally re-declared and re-assigned 
    • JavaScript takes a little longer to find the global variables as compared to the local variables

    Take an example of two donut variables declared and assigned using var. Both variables are declared with the name donut but the value of the donut inside the eatDonut function has been reassigned from ‘chocolate glazed’ to ‘chocolate-filled’. 

    In the example below, you can access the variable donut even outside of the block scope.

    How Did Let Solve the Issue of Global and Local Variables? 

    The variables declared with ‘let’ in JavaScript have block scope. It means that they can’t be accessed anywhere outside the parentheses. If we declare a new variable with the same name within the block then it’ll throw an error and if we re-assign a variable outside the given block, it will be treated as a new variable.

    Let’s expand the concept using the donut problem from the previous example. If your donut is declared with let and assign the value ‘chocolate-filled’. Assign a new value to your donut variable within the same block. An error will be thrown that ‘the identifier has already been declared’.

    If you declare a variable using let, assign it a value, and try to access it outside of the scope. You’ll get the same error: ‘Identifier donut is not defined’. 

    We have a Block-scoped Variable! Now, Why do we Need Const? 

    Why indeed!

    Const is also a block-scoped variable but that’s not all. Once you’ve declared a variable using const and assigned a value, it cannot be re-assigned. The value is now constant hence the name const! 

    To understand this, take the donut shop example again. If you declare a variable donut using const then once the value has been assigned, there’s no changing it. If you try to assign a new value to the variable donut, then you’ll get the error: ‘assignment to constant variable’

    Arrow Functions in ES6

    Arrow functions are a personal favorite from the ES6 features list. It’s a new concept in JavaScript but was previously (and currently) available in CoffeeScript as the fat arrows. 

    Before ES6: 

    The function in JavaScript was defined with the keyword function followed by the name of the function and the parentheses which include the code to be executed. That’s two lines of code just to define a function.

    In the image below, you can see a function definition in JavaScript:

    After ES6:

    Arrow functions in JavaScript are more concise and optimize function scope while coding. All arrow functions can be anonymous (defined without a name) and make use of a new token ‘=>’ instead of the function keyword.  

    The arrow functions also handle ‘this’ keyword differently as compared to the regular functions. In a regular function, ‘this’ keyword refers to the object that is called the function. This object can be anything, for example, a button or a document. In the arrow functions, ‘this’ keyword ALWAYS refers to the object that called the function. 

    Arrow Function with Two Parameters

    With the arrow function, we can define the function from the regular function example in a single line!

    Arrow Function with One Parameter

    In an arrow function with only one parameter, we can also eliminate the round parenthesis.

    Arrow Function with No Parameter

    In the arrow function below, there are no parameters. We’ve also eliminated the curly braces and returned a string directly. 

    ES6 has many more cool features. We’ll discuss these features in the upcoming articles. In the meantime, try using let, const, and arrow functions in your code and comment down below if you have any questions. 
  • 20000 all electric miles

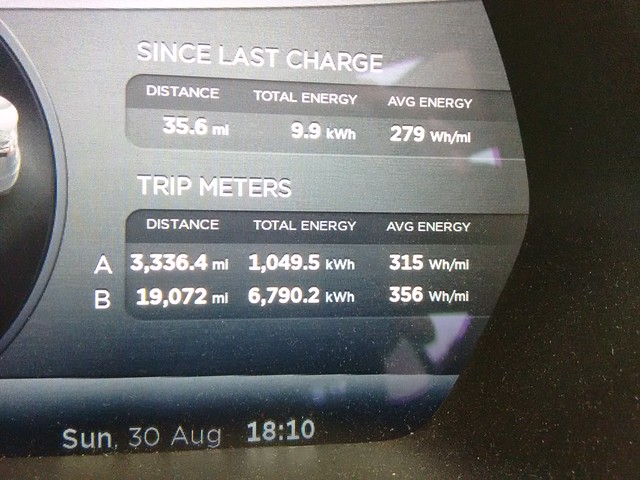
    Following on from 10000 all electric miles, today I hit the next milestone of 20000 miles completed in just over 16 months since delivery. A major chunk of this second 10000 miles was the European road trip I did with my family over August which was 3,333 miles of pure Supercharger mileage. As expected this second stint has been flawless.

    IMG_20150830_181017596

    I’ve taken to taking more detailed records of when and how much I charge at home, therefore how much I spend on ‘fuelling’ the Tesla, than I did for the first 10000 miles.

    So miles 10000 to 15000 took 618KWh of charging from home and during that time my rate was 11.4p/KWh giving a total of £70.45. On top of this I needed to charge while I was in Berlin for a weekend and there was a charge point right across the road from my hotel so really didn’t mind paying to use this and filled the battery up from the 22KW charge point landing me a bill for £17.25. So that 5000 mile stint in total cost £87.70.

    Miles 15000 to 20000 needed 325KWh of charging but I’d changed suppliers and my rate had increased to 12.91p/KWh giving a total of £41.96 for this stint.

    Adding them together gives a total cost of £129.66 to drive 10000 miles or 1.3p per mile.

    And adding this to the first 10000 miles’ total of £250.34 gives an incredibly round figure of £380 exactly or 1.6p per mile over the first 20000 miles I’ve owned the Tesla.

    So that’s the purely financial overview not going into the amount of fossil fuel that has not been used with all that implies.

  • 10000 all electric miles

    tesla10000

    7 months after taking ownership of our Tesla Model S, we have just crossed the 10000 mile threshold and thought it would be a good point to reflect on what impact if any, this decision has had.

    Financial

    Firstly I will compare how the Model S stacks up against my previous car, a VW Passat and a car of equivalent value to the Model S.

    10000 miles @ 47mpg = 212.77 gallons = 967.25 litres of diesel.

    The price of diesel has dropped dramatically over the last 7 months so to be completely unfair to the Tesla I’m going to pretend all of the diesel was bought at todays price of 114.9p/litre making a total cost of £1111.47 to do that 10000 miles.

    Next let’s see how this stacks up if I had charged 100% at home, again to put the Tesla in the worst possible light. This time the calculation is a little easier.

    3576kWh * 10.687ppkWh = £382.16

    Making a straight saving of £729.31 per 10000 miles. Now in the real world I do a lot of charging whilst out and about. I have a supercharger on route to the current client I am servicing and they also have 3 charge points at the office itself! (albeit very slow ones) There are also the Ecotricity points at the vast majority of motorway service stations. There are also charge points dotted around Coventry city centre that I make use of whilst out shopping.

    Upon taking delivery of the Model S, Chargemaster took quite a while before installing my home charge point, by which time I’d already clocked up 3000 miles all at zero cost. Since that point well over half of my milage has been using externally acquired juice. For simplicity, lets say it’s exactly half making 65% of the 10000 miles costing nothing at all. This means that the real world cost of my first 10000 miles in the Model S is about £250.34 or 2.5p/mile.

    Environmental

    I can hear the ‘Yes but that electricity all comes from coal’ arguments already.

    To which I say:

    1. At home I pay extra for a 100% renewable energy tariff.
    2. Tesla are dedicated to using renewable energy wherever possible.
    3. Ecotricity are known for their wind power initiatives.

    I cannot vouch for the energy mix from the office charge points so cannot say if the co2 levels are good, bad or ugly.

    The Passat on the other hand is rated at 158g/km or in old money, 254.2g/mile making a total co2 (not) output of 254.2KG. Lets call it a quarter of a ton per 10000 miles between friends. I have no idea if that is a lot or an insignificant amount as I have no scale to measure this amount against.

  • Printing DataTables with scroller

    So you work with DataTables (datatables.net)? Nice to meet the few 100 of you.

    Had to implement table virtualisation with the Scroller plug-in? Whoa! Down to 20.

    Now hands up if you’ve had to deal with printing the table in Internet Explorer. 3. Wha?! Only 3!?

    Well welcome to our collective world of pain. Alas there is a solution to the printing problem.

    The problem

    When you have a long table and you’ve scrolled half way down and found the data you want to print out and go to print, what do you expect? What you see on screen right? Nope, you get the top of the table.

    This is the point some funky maths gets employed (whoever is telling you maths is a waste of time is lying to you kids!) to pull the table back up to where is was on screen. And of course, restoring the table to it’s original state once the printing has finished.

    window.onbeforeprint = function() {
    	'use strict';
    	$('.dataTables_scrollBody').each(function(idx) {
    		var table = $(this);
    		var cache = {};
    
    		table.dataTableSettings[idx].sDom = table.dataTableSettings[idx].sDom.replace(/S/, '');
    		table.dataTableSettings[idx].oScroller.s.dt.bProcessing = false;
    		table.dataTableSettings[idx].oScroller.s.skip = true;
    
    		cache.oldTableTop = parseInt(table.find('table').css('top'), 10);
    		cache.oldScrollTop = this.scrollTop;
    
    		table.data('oldcss', cache);
    		table.find('table').css({
    			top: cache.oldTableTop - cache.oldScrollTop
    		});
    	});
    };
    
    window.onafterprint = function() {
    	'use strict';
    	$('.dataTables_scrollBody').each(function(idx) {
    		var table = $(this);
    		var cache = table.data('oldcss');
    
    		table.dataTableSettings[idx].sDom = table.dataTableSettings[idx].sDom.replace(/S/, '') + 'S';
    		table.dataTableSettings[idx].oScroller.s.dt.bProcessing = true;
    		table.dataTableSettings[idx].oScroller.s.skip = false;
    
    		table.scrollTop(cache.oldTableTop);
    		table.find('table')
    			.css({
    				top: cache.oldTableTop + 'px'
    			})
    			.dataTable().api().draw(false);
    	});
    };


    I couldn’t get this working with wide tables that force a horizontal scroll mind.

  • Initial setup of Vtiger and connecting a form to WordPress for leads generation and capture

    If you are developing for a client that requires webforms or CRM software then the Vtiger plugin would be most suitable.

    Vtiger

    View Article

  • Typography on the web

    Everything you need to know about how to get proper typography onto your sites today.

  • WordPress Plugins

    Here at Nearlydone, we use and recommend a variety of different plugins to help improve website functionality. By visiting WordPress.org, or your website admin plugin area, you will come across downloads, documentation and reviews to help you decide which plugins, out of a wide selection, is most suitable for you.

    View Article