JavaScript is a constantly evolving programming language, with new features and updates being released regularly. One such feature that is sure to blow developers’ minds in ES2022 is the introduction of the JavaScript private fields.
JavaScript has always had a somewhat weak support for encapsulation and data hiding, which is a fundamental principle of object-oriented programming. In the past, developers have used various techniques such as closures and WeakMap to emulate private fields, but they are often complex and hard to understand. With the introduction of private fields in ES2022, developers can now create truly private fields in JavaScript classes, making it easier to write robust, maintainable and secure code.
To create a private field, developers simply need to prefix the field name with a “#” symbol. For example, the following code creates a private field called “_secret” in a class called “MyClass”:
Once a private field has been defined, it can only be accessed within the class or its subclasses, making it truly private and inaccessible from the outside world. This can help to prevent accidental or intentional data leaks and improve the overall security of the application.
In addition, private fields can also be used in conjunction with getters and setters to provide controlled access to the data. For example, the following code creates a private field called “_name” and a getter called “name” that allows the value of the field to be read but not modified.
class MyClass {
  #_name;

  constructor(name) {
    this.#_name = name;
  }

  get name() {
    return this.#_name;
  }
}
One of the most interesting aspect of private fields is that they are also fully supported by the JavaScript reflection API. This means that, unlike closures and WeakMap, private fields are fully inspectable and debuggable. For example, the following code uses the Object.getOwnPropertyDescriptor method to inspect a private field:
Another great feature of private fields is that they can also be used in combination with other ES2022 features like decorators. Decorators are a new way of adding metadata to class members, which can be used for things like type checking, performance optimization, and more. For example, the following code uses a decorator to add a type check to a private field:
In conclusion, the introduction of private fields in ES2022 is a game-changer for JavaScript developers. It allows for true encapsulation and data hiding in JavaScript classes, making it easier to write robust, maintainable and secure code. Private fields are also fully supported by the JavaScript reflection API, making them fully inspectable and debuggable. And they can be used in combination with other ES2022 features like decorators, making them even more powerful. With the growing popularity of JavaScript, it’s the perfect time for developers to start learning and incorporating these new features into their projects.
ES6 also known as ES2015 is one of the most popular ECMAScript versions. It introduced some of the most awaited features in JavaScript such as classes, promises, and modules.
For a JavaScript developer, optimization is a never-ending process. This is why we need to stay up to date with the current trends and latest features introduced in JavaScript through the different ECMAScript versions.
To make this process easier for you, we have created a complete guide to ES6 features. The guide covers ES6 features from block-scoping to arrow functions and promises.
In this article, we will cover iterators and generators in ES6 along with the coding examples.
Iterators
An iterator is a JavaScript object that defines a sequence and returns a value upon its termination. The iterable protocol allows us to loop over custom objects and produce a sequence of values.
In more technical terms, iterators use the next() method to implement the iterator protocol. The next() method returns an object with two properties:
value: it provides the next yielded value in the sequence.
done: it provides a boolean value, trueif it’s the last value in the sequence and falseotherwise.
How Does an Iterator Work in JavaScript?
To use an Iterator, as the name suggests, we have to iterate through the iterable object to get its values. It works by calling the next() method repeatedly and returns {done: false}. Once you have iterated through the last value, the next() method will return {done: true}. Any additional yields will simply keep returning {done: true}.
Iterable Values
The most common iterable in JavaScript is an array iterator. Although, it’s not the only iterator. The iterable values in JavaScript are:
Arrays (and typed arrays)
Strings
Maps
Sets
DOM data structure (in progress)
Iterables vs. Iterators
Two concepts central to the process of the iteration are iterators and iterables.
Iterator: a data structure (or collection of values) that wants to make its elements publicly accessible.
Iterable: a pointer (or cursor in the database) that is used to traverse through the elements of a data structure.
Symbol.iterator
ECMA used the Symbol.iterator protocol to make native objects like arrays iterable. Symbols offer names that are unique and cannot clash with other property names.
Symbol.iterator returns an object called an iterator. This iterator will have a method called next which will return an object with values and done().
For-of Operator
ES6 introduced the for-of loop (an alternative to the for-in loop) that returns values instead of keys.
In the following coding example, we have created an iterator to store the infamous Fibonacci series. In the next line, we define to use the for-of loop to print all the numbers in a Fibonacci sequence until 100.
Generators
Iterators are a pretty useful concept in JavaScript and so it requires concise programming to maintain its internal state.
That’s where generator functions come in. They provide a powerful alternative to the useful yet complicated iterators.
Generators allow us to define an iterative algorithm by writing a special kind of function whose execution is continuous. Generators are defined a little differently from regular functions. Generators are defined using the function* syntax (function keyword with an asterisk)
Before ES6
Functions in JavaScript break their operation when they come across a return statement.
For Example:
After ES6
On the other hand, the generator function works a little differently. It returns a special type of iterator called a generator. When a value is consumed by the next() method, the Generator function executes until it comes across the yield keyword.
At the yield keyword, the generator will pause and return a value. The (generator) function can be called multiple times (as much as you want) and returns a new value each time.
This process is terminated with a return statement. A return statement in the generator (when executed) will make the generator end. Simply put, the return statement in generators works the same way as in regular functions.
In the following example, we have multiple mathematical operations performed on myGenerator using next().
The output of the generator function is as follows:
Generators and iterators can be quite confusing to new JavaScript coders as the concepts are quite similar. If you’re still confused between the two then just remember that the generator generates a sequence while the iterator traverses through the collection one at a time.
ES6 features have made JavaScript more powerful and optimised. If you don’t already use the new ES6 features like promises and generators in your code yet, then start today!
JavaScript was first introduced on December 4, 1995, as a scripting language. Considering it was just supposed to make web pages dynamic, it started pretty small. More features were added (and honed) along the way through the ECMAScript versions.
In this article, we will discuss two ES6 features called promises and modules. These two ES6 features have made programming complex tasks in Javascript more organised and easier.
Promises
Promises are a rather advanced topic in JavaScript. To understand promises, first, you need to be familiar with the concept of asynchronous programming in JavaScript.
Asynchronous JavaScript
JavaScript is a single-threaded programming language, which means that in a JavaScript program, only one thing can happen at a time. That’s not exactly convenient when we are working on complex logic.
To solve this issue, asynchronous JavaScript comes into play. Using asynchronous concepts such as promises, callbacks, and async/await, you can perform complex tasks that require long waits without blocking the flow of the program.
What is a Promise in JavaScript?
A promise in JavaScript is an object that represents the eventual completion (or failure) of an asynchronous operation with its (final) value.
The ES6 promise constructor takes a function which can take up to two parameters. Callback functions resolve() or reject() to indicate the success or failure of the promise.
You can declare a standard script as a module by including type=” module” in the <script> element in the HTML document (refer to the example below).
States of Promise
JavaScript promises are in one of the three following states:
Pending: initial (first) stage
Fulfilled: operation completed successfully
Rejected: operation failed
Pending
Initially, a promise is in the stage of pending which means that it is waiting for something to resume its normal program flow. Now a promise is either fulfilled or rejected.
Fulfilled
A promise is fulfilled if it’s no longer pending. Which means that it has either been resolved or rejected. A promise is fulfilled by calling the resolve() method.
A promise can not be resettled once it has been settled. Calling resolve() or reject() again will have no effect. In a nutshell, a resolved promise is immutable.
Rejected
A promise is rejected if the operation fails. A promise is rejected by calling the reject() method.
How to Use Promises in ES6
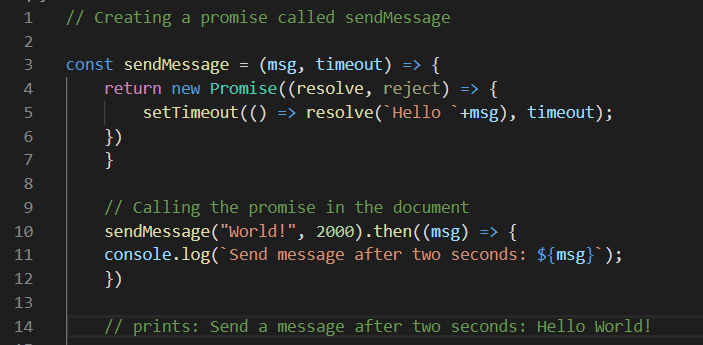
To help you understand promises, let us consider a scenario where the program will wait for two seconds before sending a message to the user.
In the example above,
The sendMessage call will wait for two seconds before sending the “Hello World” message.
The setTimeout() method will create the delay and call the resolve() method afterward
The function only takes the resolve() parameter only
The resolve() parameter value is then passed through the callback function attached with .then().
Modules
As we discussed above, the JavaScript programs used to be shorter aimed at making web pages more interactive. In a complex JavaScript program, you can use modules to distribute the code into different parts. Modules organise code and make it easily accessible and readable.
A module in JavaScript is just a file. If a project contains three JavaScript (.js) files then each file is a distinct module. We can use import/export to exchange functionality between different modules.
Exporting Values
The import keyword labels variables and functions in one script that are accessible in another script.
In the following, we will export a variable and a function from modules/math.js script.
Importing Values
The export keyword allows one script to import functionalities from another script.
In the following example, we will import modules/math.js file into the main script.
Default Export Vs Named Export
In the example above, we have used named exports. Each item (function and variable) is referred to by its name upon export. The same name is used in the other script where it’s imported.
The default export is another kind of export aimed at making it easier to have a default function provided by a module in JavaScript.
To export a function as default, we use the keyword export default before the object name.
For Example:
We can also prepend export default in front of a function and make it an anonymous function.
For Example:
Notice the lack of curly braces in the examples above. It’s because there is only one default export allowed per module. In the above example, we know that the square is the default module.
Difference Between Standard Scripts and Modules
Modules are scripts but there are a few important differences between modules and scripts to keep in mind.
Modules might behave differently as compared to the standard scripts. It’s because modules automatically execute in strict mode.
Developers often face CORS errors during local testing due to JavaScript code security requirements. The alternate (and best course) is to use a server for testing.
Modules are deferred automatically.
Modules are executed only once in a script
Module features are imported into the scope of a single script. You cannot access module features in the global scope.
Modules are a comparatively new but easy concept to understand. Whereas, promises are a quite complex concept. But both promises and modules have made coding in JavaScript more organised and clean. Make sure that you try both of these interesting ES6 features in your code to add extra and interesting functionality.
JavaScript remains one of the most popular programming languages in 2020. JavaScript was initially created to make the web pages more interactive.
Unlike other programming languages such as Java and C#, JavaScript was perfected over the years through different ECMAScript versions. Each ECMAScript version hones the old features and introduces new features to make JavaScript more powerful and concise.
In this article, we will discuss two object-oriented programming concepts introduced in ES6, classes, and object literals.
Classes
Classes are one of the most awaited features introduced in ES6. If you have worked with Java or Python, then you will be no stranger to classes.
A class in JavaScript is a unique function that is created using the keyword ’class’. It’s basically a blueprint for objects in JavaScript. The class body is enclosed in curly brackets and contains properties and methods.
A significant difference between classes and functions is hoisting.
Hoisting
Hosting is the default behavior of the JavaScript language where variables and functions declarations are moved to the top. To put it simply, in JavaScript we can access a variable or function before declaring it in the document.
Functions and variables in JavaScript are hoisted while classes are not. Unlike functions, you can not access a class before declaring it first. Doing which will result in a reference error.
Note: the code within the class body is always executed in a strict mode. It prevents certain actions from taking place within the class body and throws exceptions.
Class Definition in JavaScript
Classes in JavaScript can be defined in two ways:
Class keyword
Class expressions
Class Definition using the Class Keyword
Classes in JavaScript can be defined using the class ‘keyword’ along with the name of the class.
In the example below, we have defined a Person class using the class keyword:
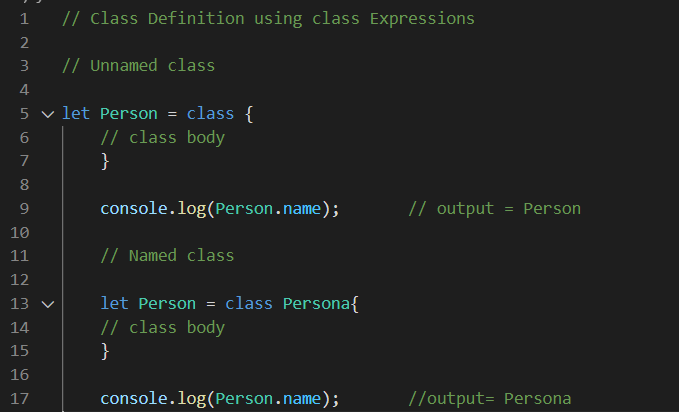
Class Definition using the Class Expressions
Class expressions are another way to define classes in JavaScript. Class expressions can be both named or unnamed. A named class expression is local to the body of the class. It can be retrieved using the name property of the class.
In the example below, we have used the class expressions to define two classes (named and unnamed) and access their name property:
Class Constructors
Class constructors are a special member function of the JavaScript class. The constructor method is used to create and initialize new objects in a class.
There can be only one constructor function in a class. Adding more than one contractor method will result in a syntax error.
Note: If we don’t use a constructor method, JavaScript will automatically add an (empty and invisible) constructor method in the class body.
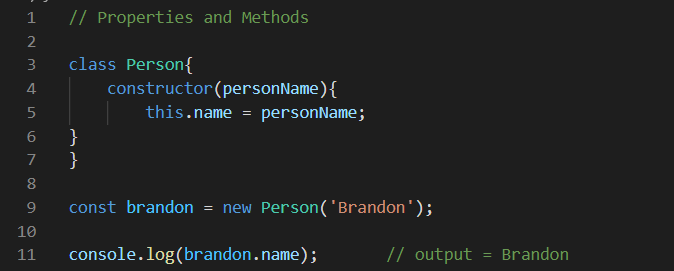
Methods and Properties in JavaScript Classes
Classes contain methods and properties. These class members are defined within the body of the class i.e. inside the curly brackets.
Methods are actions that the JavaScript objects can perform
Properties are characteristics of a JavaScript object
In more technical terms, methods are functions associated with the class and properties are variables associated with the class.
For example:
Enhanced Object Literals
In JavaScript, almost everything is an object. In fact, all JavaScript values are objects except for the primitive values (number, boolean, etc).
The simplest and fastest way to define objects in JavaScript is through the object literals. To create a JavaScript object using object literal, we simply list the values in ‘key: value’ pairs separated with commas. These values can be functions or properties.
ES6 has introduced a more precise way of declaring object literals. We’ll discuss three major ways introduced in ES6 to make object literals more precise.
Shorthand for initializing properties
Shorthand for defining methods
Computing property names and expressions
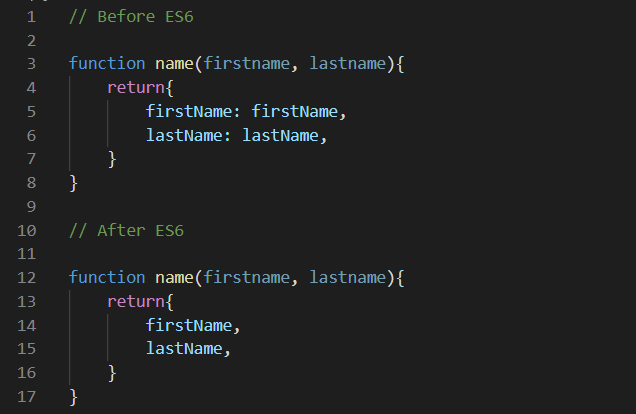
Shorthand for Initializing Properties
Before ES6, initializing object properties was kind of tedious. In the following coding example, we’ll demonstrate how object properties were defines before and after ES6.
Notice how we no longer need to assign each parameter value to the property. It basically checks if the object property key has a corresponding variable name and assigns the value of the variable to the object property. If no such variable is found, then it simply throws an error.
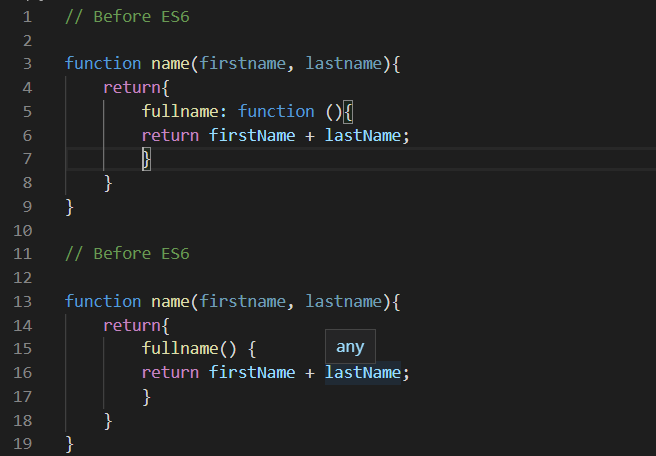
Shorthand for Defining Methods
Before ES6, a function keyword was used to define functions in objects. Once again, ES6 eliminated the unnecessary keywords and operators to make the code cleaner.
In the following coding example, we have demonstrated how functions were defined before and after the enhanced object literals.
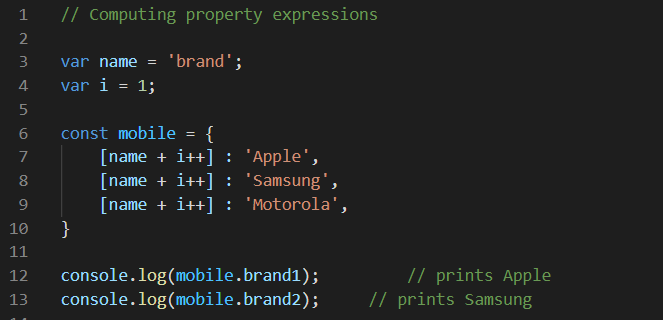
Computing Property Names and Expressions
Computed expressions are an interesting and innovative enhancement to the object literals in ES6. You must’ve seen something similar in the destructuring assignment topic.
Basically, there are two ways to specify a key to an object property: dot notation and square brackets notation. The bracket notation enables us to access values using an expression.
With computed property expressions, we can use square brackets to provide a regular expression instead of a regular property name. The property name is evaluated using a regular expression.
In the following example, we will demonstrate how property names can be computed.
The value of the name was computed to “brand”, which is what we used to access the property value.
Similarly, in the following example, the value of ‘i’ is evaluated and used as a property name:
Classes and object literals have introduced a very concise and powerful way to code in JavaScript. Whether you’re a new JavaScript developer or experienced, these features will add character to your projects.
JavaScript is one of the most popular programming languages in 2020. What’s unique about javaScript is that it wasn’t released as a complete programming language. JavaScript was improved over the years through ECMAScript versions.
ES6 also known as ES2015 is one of the most popular ECMAScript versions. It introduced multiple new features and improved some old ones.
In this article, we will be discussing two ES6 features that have made our code more precise and cleaner:
Destructuring assignment
Template strings
We’ll discuss each concept with its use cases, the problems it solved, along with the coding examples. So, without further ado, let’s move on!
Destructuring Assignment
Destructuring in JavaScript allows us to extract array elements and object properties and store them in variables. Destructuring is a lot similar to the spread operator that we discussed before but the concept is a little different.
The spread operator takes all the elements of an array and puts them into another array.
Destructuring allows users to take single elements from an array or object and store them in a distinct variable.
Destructuring Assignment and Spread Operator
As destructuring is often confused with the spread operator, we’ll discuss how destructuring assignment and spread operator works first. As we know that the spread operator (…) can be used to unpack and assign values to new variables in an array.
In the following example, we’ve created an array called x and assign its first and second index values to variables a, b, and spread the rest into the variable using the spread (…) operator.
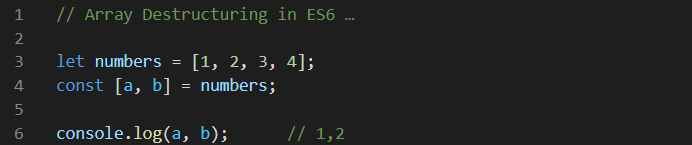
Array Destructuring
We can assign the values of array elements to other variables using the destructuring assignment.
In the following example, we’ve created an array called numbers and assign the first two elements values to variables a and b.
In array destructuring, the order of the elements defines its values.
In the next example, we’ve demonstrated the concept of order in destructuring by leaving blank space between commas. The space between the first and last elements indicates that the second element must be ignored while destructuring the array.
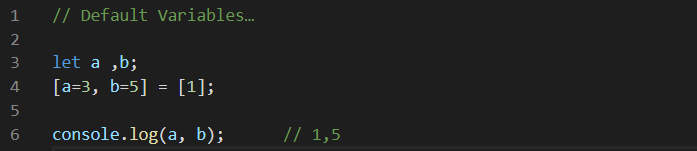
If the variables have a default value then the new value will be reassigned to the variable.
In the following example, we’ve default values 3 and 5 to variables a and b. Using destructuring, we’ve assigned a = 1 while b = undefined. In this case, the default value of b will be used.
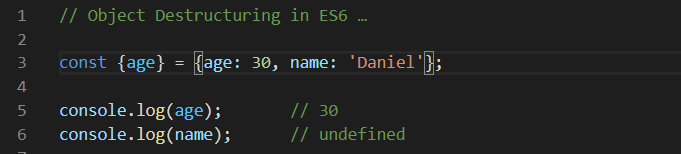
Object Destructuring
Object destructuring in JavaScript is similar to array destructuring. Although in array destructuring, we assigned values with respect to the order. In object destructuring, we assign values using the property name. In the following example, we’ve assigned a value of the 30 to the age variable only (on the left-hand side). When logged on the console, the function only returned a value of 30 for age whereas the name variable returned undefined.
A variable can be assigned a default value if the value undefined is unpacked from the object.
In the following example, we have an object with two variables a and b with the default values of 30 and 7. The unpacked value for b is undefined. In which case, the default value is used.
Template Literals
Templates literals are an innovative way to present text in JavaScript.Template literals are basic string literals enclosed by backticks (` `) instead of double or single quotes and allow embedded expressions.
With template literals, we can do the following functions:
String and expression interpolation
Multi-line strings
String tagging
Templates literal is not an entirely new ES6 feature. Before ES6, it was called template strings but lacked some finer details that were in the later ECMAScript versions.
Template literals also known as string interpolation is a well-known concept in other programming languages like Perl, Python, and Ruby.
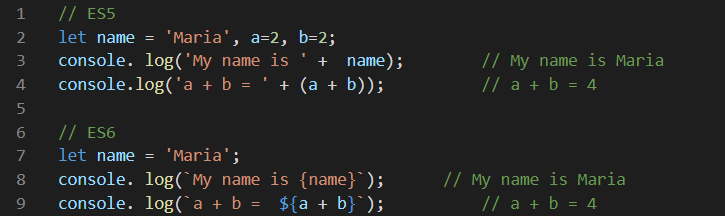
String and Expression Interpolation
Template literals contain placeholders ‘{variable}’ that can be used to insert the value of a variable in a string. A template literal can have more than one placeholder. When the function is called, everything enclosed in (` `) is passed, all the expressions along with the rest of the text.
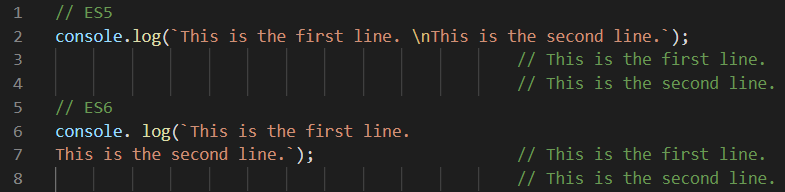
Multi-line Strings
In string literals, we require an escape sequence (/n) to invoke a newline character. Template literals made it much simpler. In template literals, we can add a new line by pressing the enter key on the keyboard.
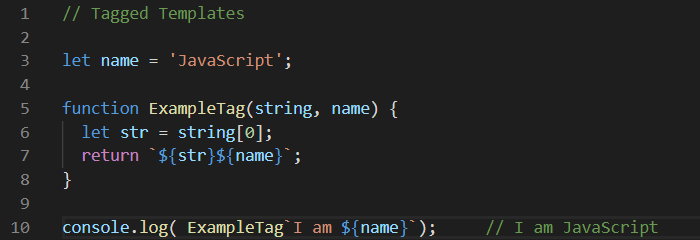
Tagged Templates
Tagged templates are a comparatively advanced concept. Tags only work within the confines of the backticks (` `). The tags allow users to combine template literals with custom functions to provide powerful functionality.
Tagged templates are used by a number of JavaScript libraries such as Styled Components, and GraphQL.
Raw Strings
Tagged templates also include a special raw property. It’s available on the first parameter of the tag function. The raw string can be accessed as it is.
For example, if you wrote an escape character in the raw string, it will be printed as it was written and not as the character.
Notice how the escape character ‘\n’ was printed instead of starting a new line.
Template strings and destructuring assignments can be a confusing concept for old JavaScript coders but they can make your code very concise and clean. Apply the concepts in your JavaScript code and you’ll automatically see the difference!
ES6 brought a lot of new and exciting features to JavaScript. These features are making the lives of developers easier than ever before by allowing them to code in a more elegant and concise way.
Among other features, ES6 also included multiple upgrades in parameter handling and that’s what we will be reviewing today.
In this article, we’ll be discussing the three most-awaited parameter handling features introduced in ES6:
Default parameters handling
Spread operator
Rest parameter
Parameter and Arguments
There are two basic concepts you must be familiar with before diving deeper into parameter handling:
Parameters: the variable names declared at the time of the function definition.
Arguments: the actual values passed down to a function when it’s called.
Default Parameter Handling
In any well-coded program, the developer must account for all scenarios. How the function will work if the value is not passed, or if the value is invalid, etc.
In JavaScript, the default value for function parameters is ‘undefined’.
The default parameter handling feature enables the default values for named parameters if no value or ‘undefined’ is passed. This way, even if an invalid value or no value is passed, the function still works using the default parameter.
The use of modules in JavaScript prompted the need for default values. As default modules must be smart enough to handle a condition where a value is not provided.
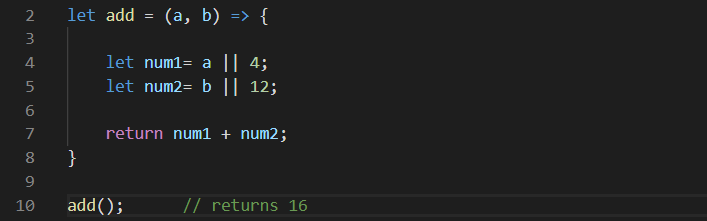
Before ES6
Before default parameters in ES6, the default values were typically assigned using the OR (||) operator.
What’s Wrong with this approach?
The logic can fail if you explicitly needed the values to be false. It’s of course an edge case, but it shows that there is a gap in the logic.
Important: In the example above (and nearly all other examples in the article), we’ll be using the arrow functions. It’s another excellent ES6 feature. If you’re unfamiliar with the arrow functions, then it’s a good time to check our article on block scope and arrow functions.
After ES6
ES6 introduced default parameters in JavaScript. It enabled developers to assign a value to the parameters at the time of function definition. The default value will take over if no value or ‘undefined’ is passed.
In ES6, even if the value of the parameter was explicitly set to ‘undefined’, the function will still use the default value.
Each time a function is called, the default parameter is re-evaluated and a new object is created. This applies to functions and variables too.
The parameter values are assigned left-to-right. If you set one default parameter and pass only one value with the function call, then the value passed at the time of function call will overwrite the default value, and the second parameter will still be undefined.
Spread Operators
Spread operator denoted by three dots (…) takes an iterable such as an array or a string and as the name suggests, spreads its elements onto another array, object, or even as arguments of a function.
In a nutshell, the spread operator expands an array into its elements.
With the spread operator, we can perform the following operations:
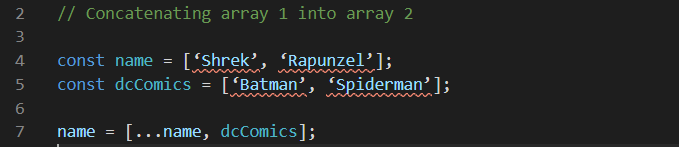
Concatenate (combine) arrays
Copy one array to another
Pass an arbitrary number of arguments to the function
It’s the exact opposite of the REST syntax.
In ES6, the Spread operator worked only with an array. Rest/Spread Properties for ECMAScript proposal added spread properties to the object literals in ES2018.
Before ES6
The spread operator offered a more concise way to:
Combine or copy arrays
Passing array as an argument
In Function Calls
The apply () function was used to pass array elements as arguments to a function.
In the following example, we’ll pass an array as a function argument using the apply method.
The apply() method gets the job done but it’s quite complicated.
In Array Literals
Before the spread operator, copying or combining arrays used to require a combination of array functions such as push(), concat(), and splice(). This would make the code messy and difficult to read.
There was also an issue of copying the ‘array elements’ vs. copying ‘reference to the arrays’. For example, if we copy one array ‘arr’ to another ‘arr2’ using the assignment operator, it will assign arr to arr2. Now, if we make changes in arr2, then arr will be mutated as well.
After ES6
Compared to the apply function, the spread operator offers a more precise way to pass array elements as arguments. See the example below:
The spread operator is (kind of) an all-in-one solution for copying, combining, or mutating arrays in different ways.
In the following example, we’ll copy an existing array to another using the spread operator.
You can also concatenate two arrays easily using the spread operator.
Rest Parameters
Many built-in JavaScript functions (such as Math.max) support an arbitrary number of arguments. The question here is:
How does it work?
How can we create a function that accepts an arbitrary number of arguments?
Rest parameters!
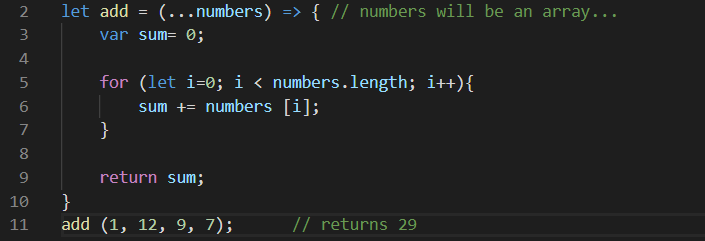
The Rest parameter enables us to represent an indefinite (or arbitrary) number of arguments as an array.
The syntax for the Rest parameter (…) is identical to the spread syntax but the concept is different or opposite (to be exact). A few important things about the Rest parameters are:
In the case of more than one parameter, only the last parameter can be the Rest parameter.
Rest parameters can only be used once in the function definition
Array methods can be used on the Rest parameter, but not on the arguments object
Before ES6
An array-like object ‘argument’ was available to the function definition, in the previous versions of ECMAScript. It contained the values of arguments and could be accessed through the index (like an array).
The problem with the argument object is that array functions cannot be directly applied to the arguments. Also, argument objects are not available in the arrow functions.
After ES6
Rest parameters were introduced in ES6 to represent function arguments as an array. The arrow functions cannot use the argument object. Also, The rest operator is much easier to use as compared to the argument object.
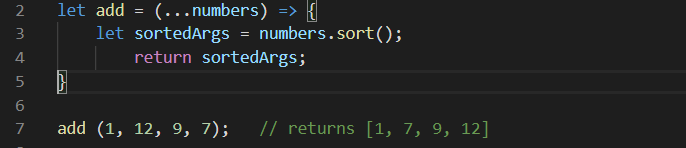
Array functions can be applied directly to the Rest parameters.
In this example, we’ll use the array of the same number from the previous example and apply the array function sort() on it. The function will return a sorted array of numbers.
Do not confuse Rest parameters with REST (Representational State Transfer) web services. They’re two totally different concepts.
Reading through the article, you must’ve realized how ES6 solved many previous issues regarding parameter handling in JavaScript. Make sure to practice them in your code.
We’ll discuss more cool ES6 features in the upcoming article until then, don’t forget to try default parameters, and spread and rest syntax in your code!
ES6 also known as ECMAScript 2015 took the JavaScript enthusiasts around the world by storm with its unique features. It’s more famous than any other ECMAScript version and you probably won’t find any JavaScript developer who hasn’t put the new ES6 features in practice.
Did you know?
Six different versions of ECMAScript were released before ES6 (Yes, there was a version 5.1 too)!
So, what makes ES6 different from the other ECMAScript versions?
From the template literals to an arrow function, nearly every feature of ES6 is not just ingenious but solved some major issues with JavaScript.
In this article, we’ll be discussing two fundamental features of ES6 that will change the way you’ve been coding in JavaScript. Just to keep it interesting, our second ES6 feature, arrow functions can reduce five-lines of code into one!
Block Scope in ES6 | const and let
In programming, variables are used to store data. There are three ways to declare variables in JavaScript:
var
let
const
Before ES6, the variables declared in JavaScript had two scopes; local scope and global scope. The scope of a variable can be defined as the visibility and accessibility of the variable in certain parts of the code. A variable is said to have:
Function scope: when the variable is declared within the parenthesis of a function
Global scope: when the variable is declared outside of the parenthesis or at the top of the overall program code
To solve the issue of function and global scope in a variable, let and const were introduced in ES6. Both let and const are block-scoped variables and can only be accessed within the given block or parentheses that they are declared in.
Before ES6 – Variable Declaration using var
Before ES6, a variable in JavaScript could be accessed outside the block or parentheses. One variable could even be re-assigned within the scope of a function. This lead to a number of issues:
Code became hard to maintain
Collision with variables from different libraries
Variable could be accidentally re-declared and re-assigned
JavaScript takes a little longer to find the global variables as compared to the local variables
Take an example of two donut variables declared and assigned using var. Both variables are declared with the name donut but the value of the donut inside the eatDonut function has been reassigned from ‘chocolate glazed’ to ‘chocolate-filled’.
In the example below, you can access the variable donut even outside of the block scope.
How Did Let Solve the Issue of Global and Local Variables?
The variables declared with ‘let’ in JavaScript have block scope. It means that they can’t be accessed anywhere outside the parentheses. If we declare a new variable with the same name within the block then it’ll throw an error and if we re-assign a variable outside the given block, it will be treated as a new variable.
Let’s expand the concept using the donut problem from the previous example. If your donut is declared with let and assign the value ‘chocolate-filled’. Assign a new value to your donut variable within the same block. An error will be thrown that ‘the identifier has already been declared’.
If you declare a variable using let, assign it a value, and try to access it outside of the scope. You’ll get the same error: ‘Identifier donut is not defined’.
We have a Block-scoped Variable! Now, Why do we Need Const?
Why indeed!
Const is also a block-scoped variable but that’s not all. Once you’ve declared a variable using const and assigned a value, it cannot be re-assigned. The value is now constant hence the name const!
To understand this, take the donut shop example again. If you declare a variable donut using const then once the value has been assigned, there’s no changing it. If you try to assign a new value to the variable donut, then you’ll get the error: ‘assignment to constant variable’
Arrow Functions in ES6
Arrow functions are a personal favorite from the ES6 features list. It’s a new concept in JavaScript but was previously (and currently) available in CoffeeScript as the fat arrows.
Before ES6:
The function in JavaScript was defined with the keyword function followed by the name of the function and the parentheses which include the code to be executed. That’s two lines of code just to define a function.
In the image below, you can see a function definition in JavaScript:
After ES6:
Arrow functions in JavaScript are more concise and optimize function scope while coding. All arrow functions can be anonymous (defined without a name) and make use of a new token ‘=>’ instead of the function keyword.
The arrow functions also handle ‘this’ keyword differently as compared to the regular functions. In a regular function, ‘this’ keyword refers to the object that is called the function. This object can be anything, for example, a button or a document. In the arrow functions, ‘this’ keyword ALWAYS refers to the object that called the function.
Arrow Function with Two Parameters
With the arrow function, we can define the function from the regular function example in a single line!
Arrow Function with One Parameter
In an arrow function with only one parameter, we can also eliminate the round parenthesis.
Arrow Function with No Parameter
In the arrow function below, there are no parameters. We’ve also eliminated the curly braces and returned a string directly.
ES6 has many more cool features. We’ll discuss these features in the upcoming articles. In the meantime, try using let, const, and arrow functions in your code and comment down below if you have any questions.
So you work with DataTables (datatables.net)? Nice to meet the few 100 of you.
Had to implement table virtualisation with the Scroller plug-in? Whoa! Down to 20.
Now hands up if you’ve had to deal with printing the table in Internet Explorer. 3. Wha?! Only 3!?
Well welcome to our collective world of pain. Alas there is a solution to the printing problem.
The problem
When you have a long table and you’ve scrolled half way down and found the data you want to print out and go to print, what do you expect? What you see on screen right? Nope, you get the top of the table.
This is the point some funky maths gets employed (whoever is telling you maths is a waste of time is lying to you kids!) to pull the table back up to where is was on screen. And of course, restoring the table to it’s original state once the printing has finished.